badai.xyz
Building and installing Coreboot on Thinkpad T60 with AMD graphics
Updated 2022-10-08
This article will be one of the longer ones as I’ll be covering the building and installation process of Coreboot on Thinkpad T60. The T60 I have has AMD graphics installed, therefore video BIOS must be extracted for it since there is no open-source alternative. Users who have Intel graphics can still follow this guide, as you can just skip parts related to video BIOS.
This guide excepts the reader to be familiar with Linux and to have a basic understanding of its usage. For example, software installation or adding kernel parameters is not covered in this article.
This build of Coreboot has compromises: GRUB doesn’t boot and GRUB payload doesn’t work. As a replacement I recommend Syslinux. You may be able to find a better version of Coreboot where the GRUB does work, but the version used here has that flaw. In case you know of a better version of Coreboot, please email me so I can update this article. (address on the front page)
CAUTION: When proceeding to flash Coreboot, keep in mind that there is a risk of bricking the machine, and it’s quite probable you don’t understand what you are doing. It’s highly recommended to have external programming equipment for backup in case something goes wrong. Please refer to the section “unbrick” if you managed to brick your machine.
Before proceeding it’s recommended to take a look at T60 wiki page: https://www.coreboot.org/Board:lenovo/t60. (as of writing this article, it’s very outdated)
Preparation
Firstly “iomem=relaxed” should be added to kernel parameters. Most of the reading and writing operations will not work otherwise. Refer to Arch Wiki if you don’t know how to do this: https://wiki.archlinux.org/title/Kernel_parameters.
You will need two versions of flashrom, a patched version and a normal version. The first flash is done with the patched version and the second one with regular flashrom. Libreboot does have patched flashrom binaries, and that’s my recommended method of getting the patched version. Download from https://libreboot.org/download.html. Libreboot’s binaries include regular flashrom binary, but I found it not to be working correctly, so I installed flashrom from my distro’s repositories.
You can also build one if you want, but I’m not going to cover that process in depth. You can get the patches from here: https://gitlab.com/4shadoww/flashrom-lenovo-patch (Libreboot’s repository doesn’t host these files anymore). Apply the patch to flashrom version 1.0 https://download.flashrom.org/releases/flashrom-1.0.tar.bz2.
Making backup of original BIOS
It’s highly recommended to take a backup of your bios, as every BIOS image is unique. You can just test which one does work for you (if you have 32-bit CPU, naturally use i686 version):
# ./flashrom/x86_64/flashrom_lenovobios_sst -p internal -r backup.rom
# ./flashrom/x86_64/flashrom_lenovobios_macronix -p internal -r backup.rom
If this fails you may have forgotten to add kernel parameter: “iomem=relaxed”
Verify the image to be absolutely sure it’s valid.
# ./flashrom/i686/flashrom_lenovobios_macronix -p internal --verify backup.romExtracting video BIOS
If your machine does have AMD graphics, that means you will need a proprietary video BIOS. There are a few ways to do this. The recommended method is to try to extract it from the backup rom. You may also try to extract the VBIOS from the kernel or mapped memory.
But first, you’ll have to find out your GPU’s id:
$ lspci -nvAnd find the GPU:
01:00.0 0300: 1002:7149 (prog-if 00 [VGA controller])
    DeviceName: VGA compatible controller
    Subsystem: 1002:0000
    Flags: bus master, fast devsel, latency 0, IRQ 16
    Memory at c0000000 (32-bit, prefetchable) [size=128M]
    I/O ports at 4000 [size=256]
    Memory at cc120000 (32-bit, non-prefetchable) [size=64K]
    Expansion ROM at 000c0000 [disabled] [size=128K]
    Capabilities: <access denied>
    Kernel driver in use: radeon
    Kernel modules: radeon, amdgpu
In this case, the vendor ID is 1002 and the device ID is 7149.
Method 1
Update 2022-10-08: not recommended because the extracted rom could miss important patches applied by bios in runtime.
Download bios_extract tool:
$ git clone http://review.coreboot.org/p/bios_extract.gitDecompress the rom:
$ ./bios_extract backup.romExample output:
Using file "/home/shadoww/t60_bios.bin" (2048kB)
Found Phoenix BIOS "Phoenix FirstBIOS(tm) Notebook Pro Version 2.0 for ThinkPad"
Version "79ETC9WW", created on 12/22/06 at 13:54:43.
0x1E83CA ( 31782 bytes)   ->   romexec_0.rom
0x1E7724 (  3215 bytes)   ->   display_0.rom    (4752 bytes)
0x1E72D5 (  1072 bytes)   ->   decompcode_0.rom          [0x7000:0x0030]
0x1E62B0 (  4110 bytes)   ->   56_0.rom (40800 bytes)
0x1E6213 (   130 bytes)   ->   acpi_0.rom   (244 bytes)
0x1E61C1 (    51 bytes)   ->   acpi_1.rom
0x1E5FFC (   426 bytes)   ->   acpi_2.rom
0x1E5F9E (    71 bytes)   ->   acpi_4.rom   (82 bytes)
0x1E5F58 (    43 bytes)   ->   acpi_5.rom   (50 bytes)
0x1E5EED (    80 bytes)   ->   acpi_6.rom   (104 bytes)
0x1E5EA0 (    50 bytes)   ->   acpi_7.rom   (60 bytes)
0x1E5E4A (    59 bytes)   ->   acpi_8.rom   (56 bytes)
0x1E5DD1 (    94 bytes)   ->   logo_1.rom   (530 bytes)
0x1E5D24 (   146 bytes)   ->   logo_2.rom   (722 bytes)
0x1E5C95 (   116 bytes)   ->   logo_3.rom   (306 bytes)
0x1E5C52 (    40 bytes)   ->   logo_4.rom   (54 bytes)
0x1E5C12 (    37 bytes)   ->   logo_5.rom   (42 bytes)
0x1E5B8F (   104 bytes)   ->   logo_6.rom   (530 bytes)
0x1E5B03 (   113 bytes)   ->   logo_7.rom   (530 bytes)
0x1E5A77 (   113 bytes)   ->   logo_8.rom   (530 bytes)
0x1E59EC (   112 bytes)   ->   logo_9.rom   (530 bytes)
0x1E5962 (   111 bytes)   ->   logo_10.rom  (530 bytes)
0x1E5929 (    26 bytes)   ->   logo_11.rom
0x1E58D0 (    66 bytes)   ->   logo_12.rom  (178 bytes)
0x1E51BA (  1787 bytes)   ->   logo_13.rom  (30278 bytes)
0x1E50D5 (   202 bytes)   ->   SmartCardPAS_0.rom   (156 bytes)
0x1E508E (    40 bytes)   ->   tcpa_*_0.rom
0x1E0020 ( 20544 bytes)   ->   romexec_1.rom
0x1DBF79 ( 16528 bytes)   ->   strings_0.rom    (42552 bytes)
0x1CC750 ( 63488 bytes)   ->   update_0.rom
0x1C2C24 ( 39701 bytes)   ->   oprom_0.rom  (65024 bytes)
0x1B8F11 ( 40184 bytes)   ->   oprom_1.rom  (65536 bytes)
0x1B473F ( 18359 bytes)   ->   oprom_5.rom  (30208 bytes)
0x1B0928 ( 15868 bytes)   ->   oprom_6.rom  (26112 bytes)
0x1B056E (   927 bytes)   ->   logo_14.rom  (4998 bytes)
0x1B0371 (   482 bytes)   ->   tcpa_<_0.rom (677 bytes)
0x1B00DF (   631 bytes)   ->   font_0.rom   (1024 bytes)
0x1A6438 ( 39884 bytes)   ->   oprom_2.rom  (65536 bytes)
0x19C808 ( 39957 bytes)   ->   oprom_3.rom  (65024 bytes)
0x193151 ( 38556 bytes)   ->   oprom_4.rom  (65536 bytes)
0x18E6EE ( 19016 bytes)   ->   setup_0.rom  (46156 bytes)
0x18A9DA ( 15609 bytes)   ->   template_0.rom   (33664 bytes)
0x182125 ( 34970 bytes)   ->   miser_0.rom  (51520 bytes)
0x1723B2 ( 64856 bytes)   ->   tcpa_Q_0.rom (129104 bytes)
0x16D6A6 ( 19697 bytes)   ->   acpi_3.rom   (54401 bytes)
0x16AE8B (    67 bytes)   ->   logo_0.rom   (122 bytes)
0x16A4F6 (  2426 bytes)   ->   logo_15.rom  (26870 bytes)
0x169FF1 (  1258 bytes)   ->   logo_16.rom  (14014 bytes)
0x1698B6 (  1824 bytes)   ->   logo_17.rom  (13578 bytes)
0x1691EC (  1711 bytes)   ->   logo_18.rom  (13578 bytes)
0x168BBF (  1554 bytes)   ->   logo_19.rom  (13578 bytes)
0x1649C6 ( 16862 bytes)   ->   tcpa_H_0.rom (23728 bytes)
0x1549A7 ( 65536 bytes)   ->   2F_0.rom
0x14E98C ( 21504 bytes)   ->   2E_0.rom
0x14C971 (  7026 bytes)   ->   2D_0.rom
0x14BE64 (  2806 bytes)   ->   2C_0.rom (24727 bytes)
0x14772B ( 18206 bytes)   ->   tcpa_K_0.rom (36682 bytes)
0x147502 (   526 bytes)   ->   tcpa_K_1.rom (596 bytes)
0x141D82 ( 22373 bytes)   ->   bioscode_0.rom   (33792 bytes)    [0xF000:0x7C00]
0x13745F ( 43272 bytes)   ->   bioscode_1.rom   (61184 bytes)    [0x4000:0x1940]
0x12D59E ( 40614 bytes)   ->   bioscode_2.rom   (58560 bytes)    [0xE000:0x1C00]
0x1257C6 ( 32189 bytes)   ->   bioscode_3.rom   (46864 bytes)    [0x7000:0x08F0]
0x12391F (  7820 bytes)   ->   bioscode_4.rom   (12736 bytes)    [0x3000:0xB350]
extra fragments: (109401, 27638 bytes)
0x12203A ( 33984 bytes)   ->   bioscode_5.rom   (63424 bytes)    [0x5000:0x0840]
0x12001B (  7621 bytes)   ->   tcpa_?_0.rom
0x107653 (  7602 bytes)   ->   bioscode_6.rom   (13360 bytes)    [0x3000:0xE510]
The VBIOS is one of the oprom_*.rom files. To figure out the right one use “romheaders” command. Romheaders program is part of “fcode-utils” https://aur.archlinux.org/packages/fcode-utils.
$ romheaders oprom_0.rom

Image 1:
PCI Expansion ROM Header:
  Signature: 0x55aa (Ok)
  CPU unique data: 0x7f 0xe9 0x77 0x02 0x00 0x00 0x00 0x00
                   0x00 0x00 0x00 0x00 0x00 0x00 0x00 0x00
  Pointer to PCI Data Structure: 0x0238

PCI Data Structure:
  Signature: 0x50434952 'PCIR' (Ok)
  Vendor ID: 0x1002
  Device ID: 0x7145
  Vital Product Data:  0x0000
  PCI Data Structure Length: 0x0018 (24 bytes)
  PCI Data Structure Revision: 0x00
  Class Code: 0x030000 (VGA Display controller)
  Image Length: 0x007f blocks (65024 bytes)
  Revision Level of Code/Data: 0x090c
  Code Type: 0x00 (Intel x86)
  Last-Image Flag: 0x80 (last image in rom)
  Reserved: 0x0000

Platform specific data for x86 compliant option rom:
  Initialization Size: 0x7f (65024 bytes)
  Entry point for INIT function: 0x27d
Make sure that the vendor and device ID are correct. (in this example they are not)
Method 2
When dumping VBIOS rom from the kernel, there is a chance that patches are applied to it at runtime. This can result in an invalid signature and Coreboot might not allow execution of that code. In this case, you must have “verified boot” disabled.
First find the location of the rom: (you can just cd to the directories if you are having trouble with finding the correct location)
$ lspci -tv
-[0000:00]-+-00.0  Intel Corporation Mobile 945GM/PM/GMS, 943/940GML and 945GT Express Memory Controller Hub
       +-01.0-[01]----00.0  Advanced Micro Devices, Inc. [AMD/ATI] RV515/M52 [Mobility Radeon X1300]
Echo 1 to the rom to allow reading:
# echo 1 > /sys/devices/pci0000:00/0000:00:01.0/0000:01:00.0/romAnd finally copy the rom:
# cp /sys/devices/pci0000:00/0000:00:01.0/0000:01:00.0/rom pci1002,7149.romMethod 3
There is a third option if everything else fails. You may be able to dump VBIOS from mapped memory.
First, find its location from memory:
# cat /proc/iomem | grep 'Video ROM'
000c0000-000cfdff : Video ROM
And then dump it:
# dd if=/dev/mem of=pci1002,7149.rom bs=1c skip=$((0x000c0000)) count=$((0x000cfdff-0x000c0000+1))The command assumes the offset to be 0x000c0000 and the length to be 65 024 bytes long.
For more info check the Coreboot wiki: https://www.coreboot.org/VGA_support#RECOMMENDED:_Extracting_from_your_vendor_bios_image
Building coreboot
This will be the most time-consuming part of this guide. First, you should get the source code.
$ git clone https://review.coreboot.org/corebootThen let’s switch to commit “ccceb2250eeb820fccfb62d1f3ab407582d2e79f”. This is the version we’ll be using. Checkout the latest commit ID from here https://coreboot.org/status/board-status.html.
$ git checkout ccceb2250eeb820fccfb62d1f3ab407582d2e79fNext, build toolchain. CUPS defines the number of make jobs used. (this may take a while)
$ make crossgcc-i386 CPUS=4The last step before building Coreboot is to configure it. Open the configuration menu:
$ make menuconfigSettings you must change:
Mainboard -->  Mainboard vendor (Emulation) --> Lenovo
Mainboard --> Mainboard model --> ThinkPad T60 / T60p

Chipset --> Include a Top swap bootblock --> true
Chipset --> Lock down chipset in coreboot --> false (this is optional)

Devices --> Graphics initialization --> Run VGA Option ROMs
Devices --> Add a VGA BIOS image --> true
Devices --> VGA BIOS path and filename --> pci1002,7149.rom (your video bios rom)
Devices --> VGA device PCI IDs --> 1002,7149 (your device's ids)
Everything else should be right, but you should at least check that the payload settings are correct.
$ make -j 6A successful build prints out the following:
FMAP REGION: COREBOOT
Name                           Offset     Type           Size   Comp
cbfs master header             0x0        cbfs header        32 none
fallback/romstage              0x80       stage           51848 none
cpu_microcode_blob.bin         0xcbc0     microcode       98304 none
fallback/ramstage              0x24c00    stage           86905 LZMA (186108 decompressed)
config                         0x3a000    raw               592 none
revision                       0x3a280    raw               715 none
build_info                     0x3a580    raw                99 none
fallback/dsdt.aml              0x3a640    raw             12618 none
vbt.bin                        0x3d7c0    raw              1384 LZMA (3744 decompressed)
cmos_layout.bin                0x3dd80    cmos_layout      1664 none
pci1002,7149.rom               0x3e440    optionrom       65024 none
fallback/postcar               0x4e280    stage           20984 none
fallback/payload               0x534c0    simple elf      69795 none
payload_config                 0x645c0    raw              1621 none
payload_revision               0x64c40    raw               236 none
etc/ps2-keyboard-spinup        0x64d80    raw                 8 none
(empty)                        0x64dc0    null          1552356 none
bootblock                      0x1dfdc0   bootblock      131072 none

Built lenovo/t60 (ThinkPad T60)
Make sure the bootlock section is exactly 128K bytes (131072) long.
Installing coreboot
Build BUCTS (comes with Coreboot source util/bucts/):
$ make -C util/bucts/Build nvramtool tool (comes with Coreboot source util/nvramtool)
$ make -C util/nvramtool/WARNING failure to follow the next steps correctly will result in a bricked machine.
Create a layout file with the following content:
0x00000000:0x001effff RW
0x001f0000:0x001fffff RO
Set BUCTS to 1:
# util/bucts/bucts --set
bucts utility version '4.13-635-gccceb2250e'
Using LPC bridge 8086:27b9 at 0000:1f.00
Setting top swap bit succeeded.

System status
=============
BILD (BIOS Interface Lock-Down) : unset, changing top swap is possible
Top Swap                        : Enabled
BIOS Boot-block Size (BBDS)     : 64K
Ranges swapped                  : 0xffff0000-0xffffffff <-> 0xfffe0000-0xfffeffff
Then flash the rom with flashrom:
# ./flashrom/x86_64/flashrom_lenovobios_macronix -p internal -w coreboot.rom --layout layout --image RWWrite config to CMOS:
# ./nvramtool -y ../../src/mainboard/lenovo/t60/cmos.layout -p ../../src/mainboard/lenovo/t60/cmos.defaultThen shutdown the machine, don’t reboot.
Then the second flash must be made. Otherwise, the machine will brick. You must use the non-patched version of flashrom.
# flashrom -p internal -w coreboot.rom
flashrom v1.2 on Linux 5.16.1-arch1-1 (x86_64)
flashrom is free software, get the source code at https://flashrom.org

Using clock_gettime for delay loops (clk_id: 1, resolution: 1ns).
coreboot table found at 0xbfb76000.
Found chipset "Intel ICH7M".
Enabling flash write... OK.
Found Macronix flash chip "MX25L1605" (2048 kB, SPI) mapped at physical address 0x00000000ffe00000.
Found Macronix flash chip "MX25L1605A/MX25L1606E/MX25L1608E" (2048 kB, SPI) mapped at physical address 0x00000000ffe00000.
Found Macronix flash chip "MX25L1605D/MX25L1608D/MX25L1673E" (2048 kB, SPI) mapped at physical address 0x00000000ffe00000.
Multiple flash chip definitions match the detected chip(s): "MX25L1605", "MX25L1605A/MX25L1606E/MX25L1608E", "MX25L1605D/MX25L1608D/MX25L1673E"
Please specify which chip definition to use with the -c <chipname> option.

# flashrom -p internal -w coreboot.rom -c "MX25L1605A/MX25L1606E/MX25L1608E"
And unset BUCTS:
# util/bucts/bucts --unset
bucts utility version '4.13-635-gccceb2250e'
Using LPC bridge 8086:27b9 at 0000:1f.00
Setting top swap bit succeeded.

System status
=============
BILD (BIOS Interface Lock-Down) : unset, changing top swap is possible
Top Swap                        : Disabled
BIOS Boot-block Size (BBDS)     : 64K
Then shutdown and start-up for the last time.
Congratulations! You have a successful installation of Coreboot if you made this far without bricking:
Unbrick
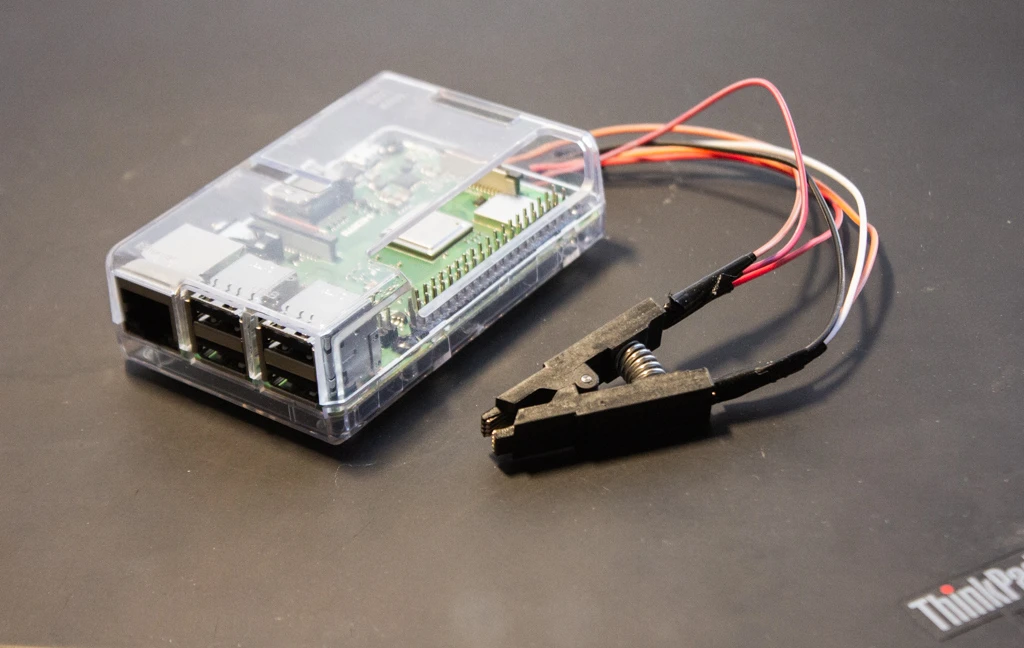
If you manage to brick your machine with the internal flash method, not all hope is lost. It’s still possible to use an external programmer to flash BIOS roms. However, this requires you to completely disassemble your T60. Libreboot has a very good and detailed guide of this process: https://libreboot.org/docs/install/t60_unbrick.html
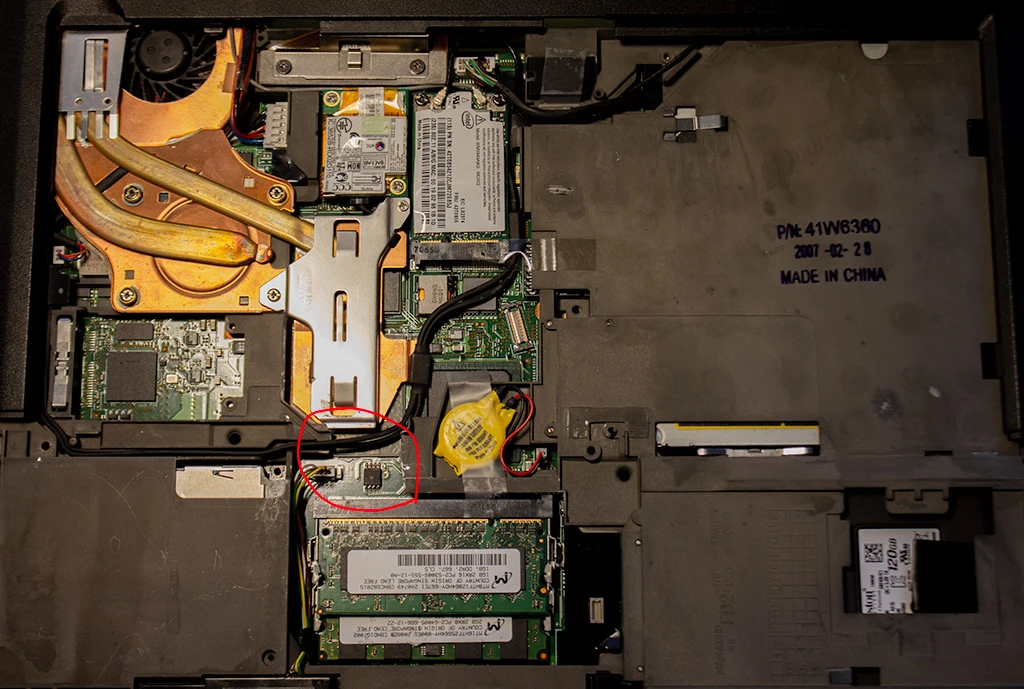
Easier access to BIOS chip mod
The BIOS chip is covered by a metal plate. You might as well cut out the section covering the chip when you have first disassembled the machine. In fact, I recommend you to do this mod if you’re planning to experiment with different builds of Coreboot. WARNING: wear eye protection when cutting the metal plating! It shatters very unpredictably!